In 2009 I finally got the confidence to take that next step in photography. I started with baby steps and started in October with submitting images to various microstock sites. In keeping with the theme of my blog I thought I would give you all some insight about these microstock sites.
Microstocks were first introduced by Bruce Livingstone, who created istockphoto. This site was originally a free photo stock site which grew rapidly. Livingstone sold istockphoto to Getty Images in 2006 for a reported 50 million dollars. Today the number of microstock sites continue to grow. A few of the larger ones include dreamstime, fotolio, bigstockphoto, shutterstock.
Microstocks are all fairly similar in submission and selection criteria. Most offer submissions via java enabled uploader and a easy HTML platform. Still other offer photographers that have large volumes of files to upload via file transfer protocol (ftp). Photos must meet certain file size requirements, usually 3MB. If you meet the file size requirement and successfully upload your photo you must enter keywords that describe your photo. These keywords are essential in getting your image seen. Once you have established your keywords, your images are submitted for a stringent review. If your images are approved your are set.
Here are a few of my portfolios for examples. While you are there if you see any thing you like feel free to purchase and use as you like.
Dreamstime Portfolio
Fotolio Portfolio
Big Stock Photo Portfolio
Thanks for looking and you too can get your images to be making money for you, just take that step outside your comfort zone and post some images. As for me, I am attempting to get the benchmark of 100 photos uploaded and accepted by June 2010. With any luck and some creative photography I may be abel to achieve this goal.

Wednesday, January 6, 2010
Monday, December 14, 2009
The Photographer's Christmas Wish List
Everyone loves to take pictures and I have put together a list of items that are sure to be at the top of a photographers wish list.
- Memory cards- be it SD, SDHC, compact flash or the Sony Memory Stick. Memory cards are without question a must have and lots of them. They are an inexpensive gift or stocking stuffer that will be greatly appreciated by any photographer.
- Aftermarket camera strap. If you are an avid photographer these 15-20 dollar beauties are invaluable if you are hiking or are in need of carrying your camera for an extended period of time.
- Cleaning kits- These kits have become increasingly less expensive over the past couple years. These are a great purchase and one that will be appreciated so much, especially after a few outings of missed photos due to artifacts on your image.
- Remote Shutter Release- These are great for taking your own family portraits or a great creative tool if you are looking to do some self portraits.
- Gorilla Pod- A great invention that has come on the scene recently. These flexible small tripods can attach to numerous structures making it an extremely versatile and lightweight tripod.
- Extra lens caps- If you have lost one, you know that a spare can prevent you from scratching that expensive lens that a 5-10 dollar lens cap could have saved.
- A photography magazine subscription. Prices for subscriptions have came way down and why not give that photography a gift that comes every month.
Well, that is my top gifts for 2009 for under $30.00. So, if you are still searching for that perfect gift for the picture taker in your life, I hope this helps.
I also wanted to share some photos with you all of the past few weeks.


I also wanted to share some photos with you all of the past few weeks.


Then it was placed on the Sleigh. Most likely the fattest tree we have ever had.
Tuesday, December 1, 2009
Digital Photo Power
With today's blog I wanted to really show you some examples of how small things can make a big impact. So, that is the theme for this post. You all may have heard about the four slain police officers in Lakewood, WA. If you haven't heard or want to know more about this horrific act, check out My Northwest.com. The coffee shop and area where these officers where brutally gunned down are places that I know well and I feel a need to show support for the officers and their families. With that said, I will be donating all the revenue from my picture sales through the month of December to the families of the fallen police officers of Lakewood. If you want to help out please take a look at my galleries and order a print or two. Here are two of my galleries Scenic and Wild. If you just care to donate directly to the families a fund has been established. You can donate to that fund directly here, Fallen Officers.
As you can see with these photos below little things do make a difference. The before and after photos are the same picture with just a few keystrokes that have really added some drama.

.jpg)
 AFTER
AFTER
.jpg)
.jpg)
.jpg)

.jpg)


As you can see with these photos below little things do make a difference. The before and after photos are the same picture with just a few keystrokes that have really added some drama.
BEFORE

AFTER
.jpg)
BEFORE

 AFTER
AFTERHere are some more photoshop and aperature projects I have been working on lately.
.jpg)
.jpg)
.jpg)


.jpg)


Again little things make a difference and you can help make a difference to the families of the Lakewood Police Officers. Here are the links again. My galleries, Scenic and Wild. Direct donations, Fallen Officers
Monday, November 23, 2009
I floated to San Diego on my own private raft and got some pictures from Balboa Park and the World Famous San Diego Zoo. That float may be the last time I visit San Diego for a little while. I wanted to spend some more time at the zoo but with the shorter days it was just not possible.


Balboa Park has beautiful architecture. I will post more pictures in the upcoming days

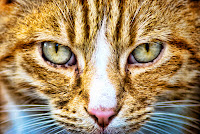
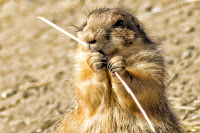
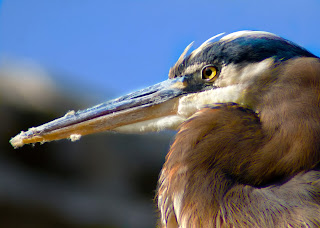
The zoo had its usual cast of characters but these were a couple of my favorites


Wednesday, October 21, 2009
Rainy Day Photography


Wednesday, October 14, 2009
Rainy Day Photography
So you live on planet earth and certain times of the year you will find some rain. Many people don't venture out into the rain to attempt to take photos. When in reality you can capture some pretty cool photos in the rain. Sure you need to protect your gear. If you are going out, break out the boots, foul weather gear and umbrella... Oh, that umbrella should be part of your camera bag on most days. A light colored umbrella can pay off greatly in difficult lighting. It can act as a diffuser for the sun. It can aid in bouncing the sun up onto your subject to really even out those harsh shadows. Now let's get down to the how to section of capturing some of those great images
Step 1. Keep the Camera Dry
We are dealing with electronic equipment here people, and contrary to popluar belief it doesn’t mix well with water. There are many solutions that I’ll suggest so just use your best judgment depending on your personal situation.

1- Don’t go in the rain. What I mean by this is to stay under cover under a shelter. If it’s just drizzling, a tree can do the trick. I’ve seen people shooting from their car or even out their window
2- Purchase a pro rain cover. B&H has a great variety ranging from $39.95 to $219.95 like the Tenba or the Aquatech or the Storm Jacket or others from FotoSharp
3- Make your own DIY camera rain cover by using a ziplock or garbage bag and elastic bands for just a few pennies. Try making 2 holes on either side of the ziplock bag and pass the camera strap through it and reattach it to the camera.
4- Buy cheap rain pants and use one leg and elastic bands.
5- Attach an umbrella to your monopod using a superclamp so that where ever your camera goes, the umbrella follows.
Step 2. Changing Lenses
Of course this doesn't apply to many of you with those new amazing point and shoot cameras that can do everything except bake you a cake. But for those of you that do own a DSLR here are some tips.
If you need to change your lenses out in the rain, you absolutely need to keep the inside of your camera, and the lens element attaching to the camera, dry. My first suggestion would be to get out of the rain completely. If you can’t, cover your camera and lens as best you can and point the camera towards the ground while switching lenses
Step 3 Use your lens hood
Again, earmuffs for you point and shoot people. The lens hood has many uses. It not only used for lens flair. I have it on primarily to protect it from bumps and nicks. But it’s also good for keeping rain drop away from your lens. I my opinion, your should have your len hood on all the time, but if you don’t this is a great time to put it on.
Step 4 Something to dry your equipment
Even if you used the 5 previous steps mentioned above, you might still end up getting some water on your gear so it’s very important to have an absorbent cloth in your bag. I recommend a large microfiber cloth but a dish towel or folded up paper towel will work fine as well.

Step 5 Bring a Monopod or Tripod
Rainy days means clouds which means no sun, which means less light. Less light means you’ll probably have to shoot at slower shutter speeds. A tripod or monopod will prevent you from taking blury images due to camera shake.
Now you have been armed with some good weaponry to take on our first weekly assignment... RAINY DAY PHOTOS... Anything that has rain in it, on it, or basically the presence of rain. Take a look at this website for some inspiration photos.. SmashingPumpkins.com
Step 1. Keep the Camera Dry
We are dealing with electronic equipment here people, and contrary to popluar belief it doesn’t mix well with water. There are many solutions that I’ll suggest so just use your best judgment depending on your personal situation.
1- Don’t go in the rain.
2- Purchase a pro rain cover. B&H has a great variety ranging from $39.95 to $219.95 like the Tenba or the Aquatech or the Storm Jacket or others from FotoSharp
3- Make your own DIY camera rain cover by using a ziplock or garbage bag and elastic bands for just a few pennies. Try making 2 holes on either side of the ziplock bag and pass the camera strap through it and reattach it to the camera.
4- Buy cheap rain pants and use one leg and elastic bands.
5- Attach an umbrella to your monopod using a superclamp so that where ever your camera goes, the umbrella follows.
Step 2. Changing Lenses
Of course this doesn't apply to many of you with those new amazing point and shoot cameras that can do everything except bake you a cake. But for those of you that do own a DSLR here are some tips.
If you need to change your lenses out in the rain, you absolutely need to keep the inside of your camera, and the lens element attaching to the camera, dry. My first suggestion would be to get out of the rain completely. If you can’t, cover your camera and lens as best you can and point the camera towards the ground while switching lenses
Step 3 Use your lens hood
Again, earmuffs for you point and shoot people. The lens hood has many uses. It not only used for lens flair. I have it on primarily to protect it from bumps and nicks. But it’s also good for keeping rain drop away from your lens. I my opinion, your should have your len hood on all the time, but if you don’t this is a great time to put it on.
Step 4 Something to dry your equipment
Even if you used the 5 previous steps mentioned above, you might still end up getting some water on your gear so it’s very important to have an absorbent cloth in your bag. I recommend a large microfiber cloth but a dish towel or folded up paper towel will work fine as well.

Step 5 Bring a Monopod or Tripod
Rainy days means clouds which means no sun, which means less light. Less light means you’ll probably have to shoot at slower shutter speeds. A tripod or monopod will prevent you from taking blury images due to camera shake.
Now you have been armed with some good weaponry to take on our first weekly assignment... RAINY DAY PHOTOS... Anything that has rain in it, on it, or basically the presence of rain. Take a look at this website for some inspiration photos.. SmashingPumpkins.com
Tuesday, October 13, 2009
Welcome to my Blog
This site is dedicated to motivating and inspiring all of you to get out and take more photos. I have developed such a passion for photography that I need to share it with everyone. Some ideas I have for this blog is to give a daily or weekly photo assignment. This is a fun way to stay inspired and creative. It will also give you an opportunity to show off your work to the 15 other people that visit my site. I will of course be adding polls periodically so be sure to drop by often. I will be documenting my travels around the pacific northwest on the blog and those are always interesting. I will also be adding tips and advice on the blog to better your photography skills. In addition, you can view my website at Tim Barron Photography. This will provide you with an example of some of my work. I am always looking for a challenge, if you have photographic needs as the holidays approach drop me a line and let's get that shot taken. It looks like I will be spending some time in the San Diego area in November, but I will be available after the 24th of November and we still have time to get your christmas shoot in and get those greeting cards done. Just let me know.
Subscribe to:
Posts (Atom)